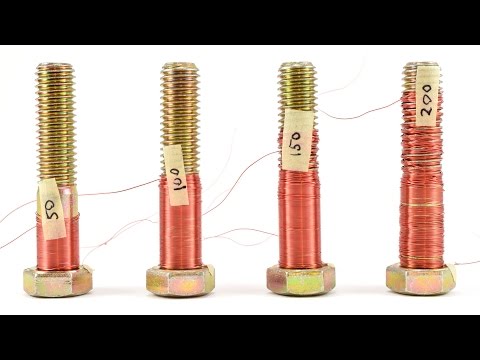
You know, the first time I tried to make an electromagnet, it was a total disaster! I plugged in the wires and, boom! Sparks flew everywhere. My mom thought I was trying to start a fire or something. Turns out, making one isn’t that scary at all.
Seriously though, there’s something super cool about turning electricity into magnetism. I mean, who knew you could just wrap some wire around a nail and make it pick up paperclips? It’s like magic, but with science!
So if you’re looking for a fun project that’ll have your friends saying, “Whoa, how’d you do that?” then stick around. You’re gonna want to try this!
Mastering Electromagnetism: 5 Essential Steps to Create Your Own Electromagnet
Alright, let’s talk about making your own electromagnet. This is a super cool project that not only gives you a hands-on experience but also helps you understand some basics of electromagnetism. You know, that magical area of physics that deals with electric and magnetic fields? So, here’s how to get started.
First off, you need some materials. Grab the following:
- Wire: Copper wire is best because it conducts electricity really well.
- Nail or iron core: A big iron nail will serve nicely as your core.
- Battery: A 9-volt battery works perfectly.
- Tape: Just to keep things secure.
Now, picture this: one time when I was in school, my friend and I tried to make an electromagnet for a science fair. We were so excited but totally clueless! We ended up with wires everywhere, but after some trial and error, we finally got it working. That mix of frustration and joy? Totally worth it!
Moving on to the actual steps:
1. **Wrap the Wire:** Take your copper wire and start wrapping it around the nail. You want to coil it really tightly—like wrapping a present—about 20-30 times. Each loop creates a stronger magnetic field.
2. **Connect the Wire:** Now take both ends of the wire and strip them just a bit so they can make good contact with the battery terminals. You can use scissors for this if you need to; just be careful!
3. **Attach to the Battery:** Connect one end of the wire to one terminal of your 9-volt battery using tape or just by pressing it down firmly if you’re careful enough not to let it slip off.
4. **Complete the Circuit:** Then connect the other end of your wire to the second terminal on the battery. If everything’s right, like my buddy and I figured out eventually, your nail should start acting like a magnet!
5. **Test It Out:** Finally, bring something metal—like paper clips or small screws—and see how many you can pick up with your new electromagnet.
And here’s something cool: If you disconnect one end of the wire from the battery, your magnet stops working! It’s like flipping a switch on and off.
Also remember: The more coils you make or if you use thicker wire, you’ll end up with an even stronger magnet!
So there you go! Once you’ve got it all set up, feel free to experiment a bit more—try different sizes or materials for cores or change up how many coils you’re using. Just remember safety first when working with batteries and wires. Enjoy creating some scientific magic!
Creating a Magnetic Field: A Step-by-Step Guide for School Science Projects
So, you’re thinking about creating a magnetic field? That’s awesome! It’s one of those cool science projects that’s not just fun but teaches you a lot about electromagnetism. I remember when I first tried making an electromagnet. It was such a thrill to see how electricity could actually create magnetism! So let’s break it down into simple steps.
First off, what exactly is an **electromagnet**? Well, it’s basically a type of magnet where the magnetic field is generated by electric current. And the best part? When you turn off the electricity, the magnetism disappears. Pretty neat, huh?
To get started on your project, here’s what you’ll need:
- Iron Nail: This will be your core.
- Insulated Copper Wire: About 3-5 meters should do.
- Batteries: You can use either AA or D batteries.
- Switch (optional): To easily turn your electromagnet on and off.
Now for the process itself. You’ll need to wrap that copper wire around the nail—this is gonna be fun!
Start by leaving a bit of wire hanging at each end before wrapping it around the nail. You want to cover as much of the nail as possible with that wire because more coils mean a stronger magnetic field. Wrap tightly and evenly; don’t rush this step.
Once you’ve got all that wire around your nail, connect one end of the copper wire to the positive terminal of your battery and the other end to one terminal of your switch (if you’re using one). Then connect another wire from the other terminal of your switch back to the negative terminal of your battery. By doing this, you’re creating a complete circuit that allows electricity to flow!
Alright! Now for some *magic.* When you flip that switch or connect those wires directly (if you’re skipping the switch), electricity flows through the copper wire, and voila! Your nail becomes an electromagnet. Go ahead and test it out; try picking up some paperclips or small metal objects with it!
But here’s something interesting: The strength of your electromagnet can change based on several factors. For example:
- The number of coils: More coils equal a stronger magnet.
- The amount of current: Using more batteries in series can boost strength.
- The core material: Different metals affect how strong your magnet can get.
Just be careful not to keep it on for too long; excess heat can damage your wire or battery.
And there you have it! You’ve just created something that ties into physics in such a hands-on way. Plus, who doesn’t love showing off their own DIY electromagnet? It’s like having superpowers over tiny metal things—what’s not to like? So gather those materials and get ready for some electrifying fun!
Understanding Electromagnets: A Grade 7 Technology Exploration in Science
So, let’s chat about electromagnets, shall we? These fascinating things are like magic but with science! Basically, an electromagnet is a type of magnet that gets its power from electricity. When you run electricity through a coil of wire, it creates a magnetic field. Pretty cool, right?
Now imagine you’re in the lab—or maybe just your garage—and you want to make your own electromagnet. This is where the fun really starts! Here’s what you’ll need:
- Insulated copper wire: This is the wire you’ll wrap around something to create the magnet.
- A ferromagnetic core: A nail or some other iron object works great for this! It helps boost the magnetic effect.
- A power source: Batteries do the trick. Just make sure they’re fresh!
To create your electromagnet, you’ll take that insulated copper wire and wrap it tightly around the iron nail. Just be careful not to overlap too much because we want nice neat coils. More coils mean stronger magnetism! Once you’re happy with how it looks, strip the ends of your wire (the insulation) and connect them to a battery. Voilà! You have an electromagnet.
You might be wondering why this whole thing works. Well, when electricity flows through the wire, it creates a magnetic field around it. The nail becomes magnetized due to being wrapped in the coil—it’s like giving it superpowers! And when you disconnect the battery, poof—its powers disappear.
But here’s something fascinating: not all metals can be used as cores for electromagnets. Iron is great because it’s a ferromagnetic material, meaning it can easily become magnetized. Other materials like aluminum or copper? Not so much—they don’t hold onto that magnetic strength well.
And if you’re feeling adventurous, try experimenting with different numbers of coils or different types of cores and see how that changes things. More coils usually mean more strength, but there’s always an exception to every rule in science!
What’s really exciting about electromagnets is their real-world applications—like they’re used in everyday things from electric motors all around us to MRI machines in hospitals. It makes you think how something so simple could lead to such incredible technology!
So next time you’re working on this project or just pondering about magnets and electricity at home or school—remember there’s some serious science behind that little nail of yours turning into a superhero for a bit!
Creating an electromagnet is one of those science projects that feels like magic when you see it work. I remember the first time I tried it out in high school. I was in the lab, surrounded by classmates, kind of nervous, and honestly, a bit skeptical. But as soon as we connected that copper wire around a nail and plugged it in, the nail turned into this super strong magnet! It was like watching a light bulb moment—everyone’s faces lit up with excitement.
So, let’s break this down a bit. An electromagnet is just a magnet that you can turn on and off with electricity. It usually consists of three main parts: a wire (usually copper), some form of metal core (like an iron nail), and a power source (like batteries). When you wrap the wire around the nail and connect it to the battery, electricity flows through the wire, creating a magnetic field around the metal core. It’s seriously cool stuff!
You might be wondering why this matters. Well, electromagnets are everywhere! They’re used in things like electric motors, generators, and even in your headphones. They help create sound waves by moving parts back and forth using magnetism. So when you listen to your favorite tunes? Yeah, an electromagnet is part of that process!
Now, here’s where it gets really fun: experimenting! Once you’ve made your basic electromagnet, try wrapping more coils of wire around the nail or using different batteries to see how it affects strength. You could even try picking up different kinds of metal objects with your new gadget. It’s all about being curious!
Honestly though? The best part isn’t just seeing how it works; it’s sharing that “aha!” moment with friends or family. Watching someone’s eyes widen as they see what you’ve created come to life—it gives you this warm feeling inside.
So if you’re ever looking for some hands-on science fun, give making an electromagnet a shot. You might surprise yourself with how easy—and awesome—it can be!